An outdoor mud kitchen transforms a corner of the backyard into a hands-on play zone where kids can stir, pour, and “cook” with nature’s ingredients. These simple setups, often just a repurposed table, a few hooks, and some salvaged cookware, encourage imaginative play, sensory exploration, and a willingness to get dirty that screens can’t replicate. As parents and caregivers look for low-tech ways to keep children engaged outdoors, mud kitchens have surged in popularity. Building one doesn’t require advanced carpentry skills or a big budget, but a few smart design choices make the difference between a project that lasts one season and one that becomes a backyard staple for years.
Table of Contents
ToggleKey Takeaways
- An outdoor mud kitchen for kids encourages imaginative play, fine motor skill development, and sensory exploration through hands-on activities with natural materials.
- A basic mud kitchen work surface should be 20–24 inches high for toddlers and preschoolers, or 24–28 inches for elementary-age children to ensure comfortable and safe play.
- DIY mud kitchen builds can cost as little as $50–$200 using reclaimed materials and basic tools like a circular saw and drill, making them an affordable alternative to pre-made options costing $150–$500.
- Include essential features such as a water source, storage hooks for cookware, a backsplash, and sealed cedar or exterior-grade plywood to ensure durability and longevity in outdoor conditions.
- Unstructured outdoor mud kitchen play reduces childhood stress, improves focus, and keeps kids engaged outdoors longer while parents supervise safely from nearby.
- Rotating accessories every few weeks and incorporating seasonal themes like planting, ice play, and leaf crafts maintains interest without requiring new purchases.
What Is an Outdoor Mud Kitchen and Why Kids Love Them
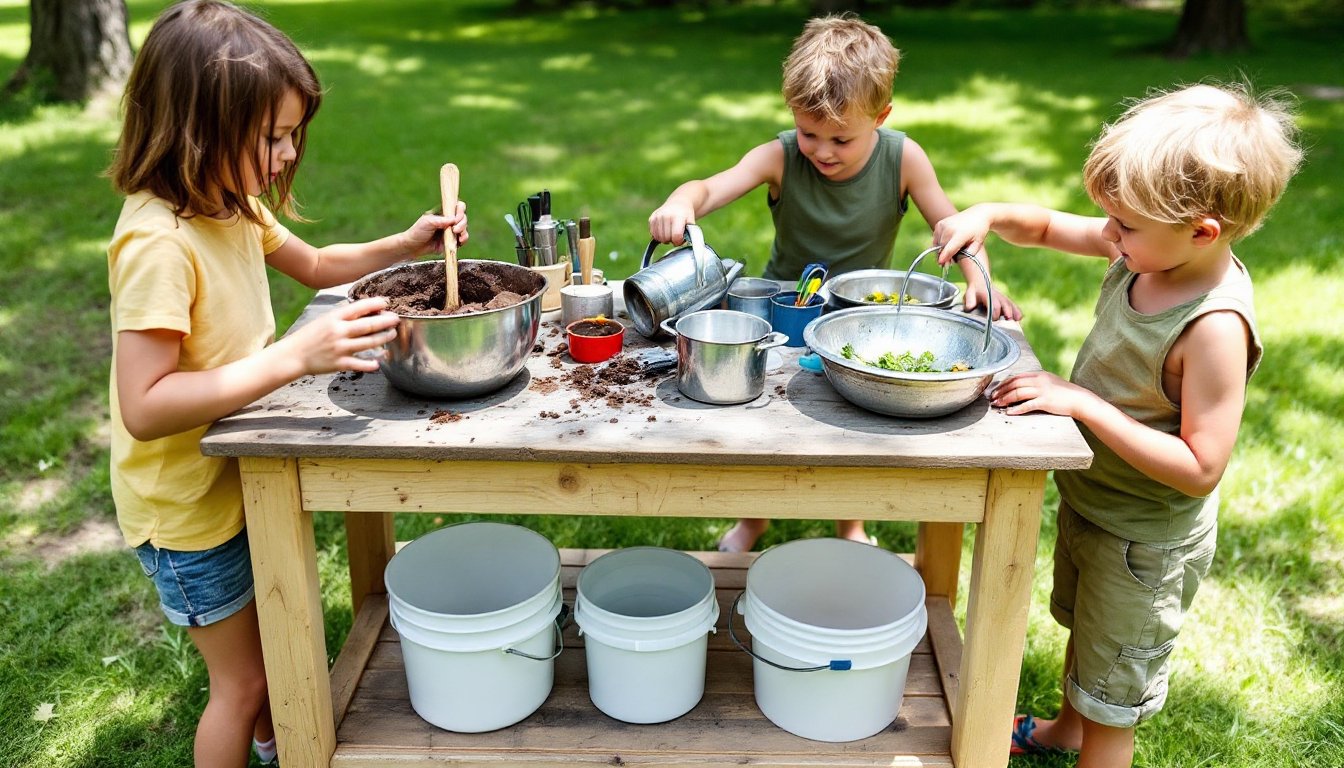
A mud kitchen is a dedicated outdoor area where children mix dirt, water, leaves, flowers, and other natural materials to mimic cooking and food preparation. The setup typically includes a work surface at kid height, storage for utensils, hooks for pots and pans, and access to water and soil.
Unlike plastic playsets that dictate a single narrative, mud kitchens are open-ended. A child might spend an hour perfecting a “soup” of dandelions and gravel one day, then switch to running a pretend café the next. The lack of predetermined rules taps into natural curiosity and problem-solving.
The tactile experience is a major draw. Squishing mud, pouring water, and stirring mixtures engage fine motor skills and sensory processing in ways that structured toys often don’t. Many kids who resist getting messy indoors will happily jump into mud play when it’s clearly the point of the activity. The outdoor setting removes the anxiety about cleanup, giving both children and adults permission to embrace the chaos.
Benefits of Building a Mud Kitchen in Your Backyard
Mud kitchens deliver developmental benefits that justify the muddy laundry. Fine motor skills improve as children scoop, pour, and manipulate small objects. Stirring thick mud builds hand strength: transferring water between containers refines hand-eye coordination.
Imaginative play thrives in unstructured environments. Without batteries or screens, kids create their own narratives, assign roles, and negotiate rules with playmates. These social interactions teach compromise, communication, and creative thinking.
Time outdoors supports physical and mental health. Studies continue to show that unstructured outdoor play reduces stress, improves focus, and encourages physical activity. A mud kitchen gives children a reason to stay outside longer, even when the novelty of the swingset has worn off.
From a practical standpoint, mud kitchens are low-maintenance entertainment. Once built, they require no power, no batteries, and minimal supervision for older toddlers and preschoolers. Parents can garden, read, or tackle yard work while kids stay engaged nearby. The setup also normalizes mess in a contained way, mud belongs in the mud kitchen, not tracked through the house.
Essential Features and Materials for Your Mud Kitchen
The core of any mud kitchen is a work surface at an appropriate height. For toddlers and preschoolers (ages 2–5), aim for a counter height of 20–24 inches. Elementary-age kids (6–10) work better at 24–28 inches. An old table, a repurposed wooden pallet, or a simple frame built from 2×4 lumber all work.
Storage and organization keep the play flowing. Install hooks (screw-in cup hooks or heavy-duty wall hooks) for hanging pots, pans, and utensils. Add a shelf or cubbies below the work surface for bowls, spoons, and muffin tins. Pegboard backing provides flexible storage and lasts longer than bare wood in wet conditions.
A water source is critical. A five-gallon bucket with a spigot mounted on a stand works if plumbing isn’t an option. For a more permanent setup, run a garden hose to a small basin or install a frost-free outdoor faucet nearby. Include a catch basin or gravel bed underneath to manage runoff and prevent standing water.
Material choices matter for longevity. Pressure-treated lumber resists rot but should never be used for cutting boards or surfaces kids will touch constantly. Cedar or redwood naturally resist decay without chemical treatment, making them safer for children’s play spaces. Exterior-grade plywood (½-inch or ¾-inch) works for countertops if sealed with a non-toxic outdoor sealer or exterior paint.
Common accessories include:
- Metal or enamelware pots and pans (thrift stores are goldmines)
- Wooden spoons, whisks, and ladles
- Muffin tins, colanders, and measuring cups
- A plastic dish tub for a “sink”
- Small buckets and watering cans
- A chalkboard or whiteboard for menus
Avoid materials that splinter easily, rust quickly, or have sharp edges. Galvanized metal accessories hold up better than plastic in sun and weather.
DIY vs. Pre-Made: Choosing the Right Option for Your Family
Pre-made mud kitchens range from $150 for basic models to over $500 for elaborate wooden units with built-in sinks and canopies. They arrive ready to assemble, often with hardware included. Quality varies widely, cheaper models may use thin wood that warps or hardware that rusts within a season. Higher-end versions often feature mortise-and-tenon joinery and marine-grade finishes.
Buying pre-made makes sense if:
- Time is limited and the budget allows
- Carpentry tools or skills are minimal
- The desired aesthetic is polished and uniform
- Warranty or customer support matters
DIY builds cost anywhere from $50 (repurposed materials and salvaged accessories) to $200 (new lumber and hardware). The investment is sweat equity rather than dollars. A basic mud kitchen can be built in a weekend with a circular saw, drill/driver, measuring tape, and exterior wood screws.
DIY makes sense if:
- Budget is tight
- The builder enjoys hands-on projects
- Custom dimensions or features are needed (accommodating a wheelchair user, fitting a narrow yard, or matching existing play structures)
- Teaching kids about building and problem-solving is part of the goal
A middle-ground option is modifying a pre-made product. An inexpensive potting bench or outdoor console table can be adapted with hooks, a basin, and a lower shelf. This approach saves time on framing while allowing customization.
Step-by-Step Guide to Building Your Own Mud Kitchen
This design uses basic framing and standard dimensional lumber. Adjust measurements to fit the available space and the child’s height.
Materials and Tools
Lumber:
- Four 4×4 posts (pressure-treated), cut to 30 inches for legs
- Two 2×4s at 48 inches (front and back lower braces)
- Two 2×4s at 21 inches (side lower braces)
- One sheet ¾-inch exterior plywood, cut to 24×48 inches (work surface)
- One 1×6 board at 48 inches (backsplash, optional)
Hardware and Fasteners:
- 3-inch exterior wood screws
- 1½-inch exterior wood screws
- Screw-in hooks (6–8)
- Non-toxic exterior paint or sealer
Tools:
- Circular saw or miter saw
- Drill/driver with bits
- Measuring tape and carpenter’s pencil
- Level
- Safety glasses and hearing protection
Build Steps
-
Cut all lumber to length. Double-check measurements before cutting. Remember that a 2×4 is actually 1½×3½ inches.
-
Assemble the frame. Lay two 4×4 posts parallel, 48 inches apart. Position a 2×4 brace across the bottom, 4 inches up from the ground. Secure with two 3-inch screws at each joint, drilling pilot holes to prevent splitting. Repeat for the opposite side. Connect front and back with the 21-inch side braces to complete the rectangle. Use a level to ensure the frame is square.
-
Attach the work surface. Center the plywood on top of the frame. The posts should sit just inside the edges. Drive 1½-inch screws every 8–10 inches around the perimeter, countersinking slightly.
-
Add the backsplash (optional but recommended). Stand the 1×6 on edge along the back of the work surface. Secure with screws through the plywood into the board. This prevents items from falling off and provides a surface for hooks.
-
Install hooks and accessories. Space hooks 6–8 inches apart along the backsplash or frame sides. Add a shelf below the work surface by screwing a 1×10 or scrap plywood between the lower braces.
-
Seal and finish. Sand any rough edges. Apply two coats of non-toxic exterior sealer or paint. Let cure fully (48–72 hours) before use.
-
Position and anchor. Place the mud kitchen on level ground. For added stability, drive 18-inch rebar stakes through holes drilled in the lower frame and into the ground, or anchor with landscape anchors.
Safety Notes
Wear safety glasses when cutting and drilling. Use hearing protection with power saws. Work on a stable surface and keep children and pets clear of the work area. If using pressure-treated lumber, do not burn scraps: dispose of them according to local regulations.
Creative Play Ideas and Activities for Mud Kitchens
Mud kitchens shine brightest when adults step back and let kids lead. That said, a few prompts can spark new directions when interest wanes.
Nature scavenger hunts provide ingredients. Challenge kids to find five different leaves, three types of rocks, or flowers in two colors. These become garnishes, “spices,” or cake decorations.
Themed play adds structure without rigidity. Suggest a restaurant where customers (stuffed animals, siblings, or parents) place orders. A “potion lab” lets kids experiment with color (crushed flower petals, dirt types) and texture (adding sand vs. leaves).
Seasonal rotations keep the setup fresh. In spring, focus on planting “gardens” in small pots with mud and seedlings. Summer brings ice play, freeze small toys or flowers in ice cube trays, then “cook” them in warm water to melt. Fall means acorn “coffee beans” and leaf “pasta.” Winter (in milder climates) can involve hot cocoa pretend play with warm water.
Measurement and math sneak in naturally. Provide measuring cups and spoons, then ask how many quarter-cups make a full cup. Older kids can follow simple “recipes” written on a chalkboard: two cups of dirt, one cup of water, three dandelions.
Collaborative projects work well for siblings or playdates. Building a mud castle, creating a multi-course meal, or staging a farmer’s market teaches cooperation and planning.
Rotate accessories every few weeks. Swapping out a colander for a funnel or adding a new whisk renews interest without buying anything new.
Conclusion
An outdoor mud kitchen blends simplicity with lasting play value. Whether built from salvaged materials over a weekend or purchased as a finished unit, it carves out space for the kind of open-ended, messy exploration that builds skills and confidence. The investment, whether time or money, pays back in hours of engaged outdoor play and developmental growth that structured toys rarely deliver.