An outdoor kitchen bar changes how homeowners use their backyards. It’s not just about grilling anymore, it’s about creating a dedicated space where guests can gather, drinks can flow, and the cook stays part of the conversation. Unlike a basic patio setup, an outdoor kitchen bar integrates cooking, prep, and socializing into one functional zone. It’s a project that demands thoughtful planning, weather-resistant materials, and a realistic budget, but the payoff is a backyard that gets used year-round. Whether working with a sprawling yard or a compact patio, understanding the design fundamentals makes the difference between a functional outdoor bar and one that sits unused after the first season.
Table of Contents
ToggleKey Takeaways
- An outdoor kitchen bar combines cooking, prep, and bar-style seating into one functional zone with a 42-inch-high counter and 12–15-inch overhang for comfortable bar stool seating.
- Material selection is critical for durability: choose granite, concrete, or porcelain tile for countertops; stainless steel or marine-grade polymer for cabinetry; and avoid wood, marble, and laminate that won’t withstand UV exposure and moisture.
- Essential features include a built-in grill (the centerpiece), a sink with proper plumbing, and outdoor-rated refrigeration, while side burners and elaborate additions should only be added if space and budget allow.
- Layout depends on yard size: small patios fit L-shaped bars (6×4 ft), medium yards work with straight bars or small islands (10 ft run), and large properties support U-shaped setups with multiple appliances and seating for 6–8 people.
- Budget ranges from $2,000–$4,000 for DIY basic builds to $15,000–$30,000+ for high-end custom designs; prioritize investing in quality appliances, weatherproofing, and proper permits rather than cutting corners on materials.
- Always maintain 36–48 inches of clearance around your outdoor kitchen bar for safe foot traffic and to prevent the space from feeling cramped during gatherings.
What Is an Outdoor Kitchen Bar?
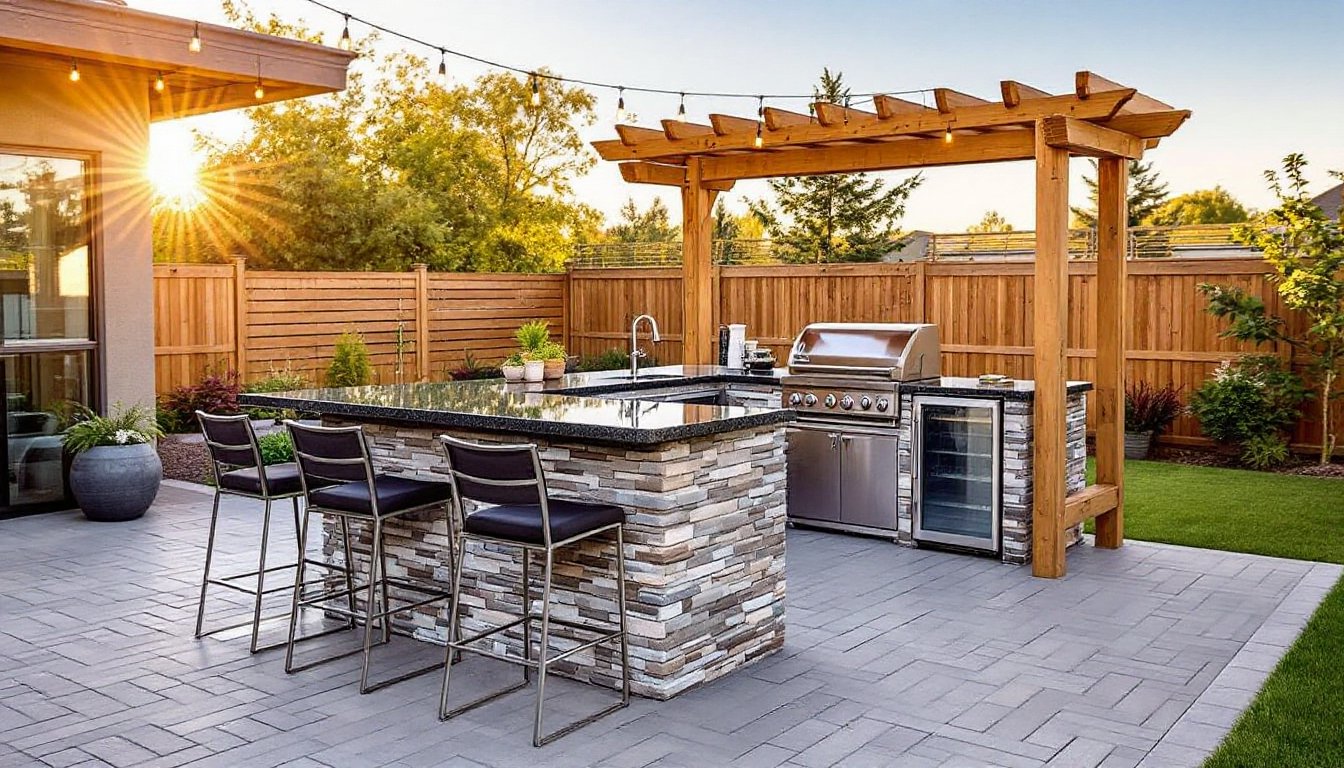
An outdoor kitchen bar is a permanent or semi-permanent structure that combines food prep, cooking equipment, and bar-style seating in an outdoor setting. It typically includes a countertop for serving, an overhang for bar stools, and built-in appliances like grills, sinks, or refrigerators.
The “bar” component refers to the elevated seating area, usually 42 inches high to match standard bar stool height, that allows guests to sit facing the prep area. This layout keeps the host engaged with guests while cooking, unlike traditional outdoor kitchens where the cook faces away.
These setups range from simple L-shaped counters with a grill and mini-fridge to elaborate islands with pizza ovens, kegerators, and full plumbing. What separates an outdoor kitchen bar from an indoor one is durability: every material must handle UV exposure, temperature swings, moisture, and in many climates, freeze-thaw cycles.
Most outdoor kitchen bars are built as part of a larger hardscape project, think patios, pergolas, or covered outdoor rooms. They’re not portable. Once installed, they’re a fixed feature, which is why planning the layout and materials upfront matters so much.
Key Design Elements for Your Outdoor Kitchen Bar
Bar Counter and Seating Options
The bar counter is the workhorse. Standard outdoor bar counters sit at 42 inches high with a 12- to 15-inch overhang to accommodate knee clearance for bar stools. Depth varies, 24 inches works for a simple serving bar, but 30 to 36 inches is better if the homeowner plans to prep food there.
Countertop materials need to resist heat, stains, and moisture. Granite and concrete are common because they handle hot pans and weather exposure. Tile works but requires sealed grout to prevent water infiltration. Avoid laminate or butcher block unless the bar is fully covered and rarely exposed to rain.
Seating comes down to bar stools. Metal frames with weather-resistant cushions hold up better than wood. If the bar is under a roof, more material options open up. Aim for three to four stools per 8-foot section of counter to avoid crowding.
Some designs include a two-tier setup: a 42-inch bar height on the guest-facing side and a 36-inch prep height on the cook’s side. It’s comfortable but eats up more space and material.
Essential Appliances and Features
A built-in grill is the centerpiece. Gas grills connect to a natural gas line or propane tank: built-in models start around $800 and go well past $3,000 for commercial-grade stainless steel. Charcoal grills are cheaper but require more clearance for ventilation.
A sink adds serious functionality but requires plumbing. Running a water line outdoors isn’t difficult if the bar is within 20 feet of the house, but drainage is trickier, most need to tie into the home’s drain system or use a gray water solution (check local codes). PEX tubing works well for supply lines and handles freeze-thaw better than copper if properly winterized.
Refrigeration keeps drinks cold and ingredients fresh. Compact outdoor-rated fridges or beverage coolers fit under the counter. Standard indoor fridges won’t survive humidity and temperature swings: outdoor units have sealed components and rust-resistant interiors.
Other popular features include:
- Side burners for sauces or side dishes (avoid if space is tight)
- Storage cabinets with marine-grade hinges and powder-coated frames
- Lighting: LED strip lights under the counter or pendant lights overhead if there’s a pergola
- Electrical outlets: GFCI-protected, weatherproof boxes installed by a licensed electrician per NEC Article 210.8
Don’t over-build. A grill, mini-fridge, and sink cover 90% of outdoor cooking needs for most households.
Materials That Withstand the Elements
Outdoor kitchen bars live outside 24/7, so material selection isn’t negotiable.
Frame and structure: Most bars use a steel stud frame or concrete block (CMU) base, then clad it with stone veneer, stucco, or tile. Steel studs resist rot but need galvanized or stainless fasteners. CMU is heavier but bulletproof in wet climates. Wood framing works only under a full roof with proper sealing.
Countertops: Granite, concrete, and porcelain tile lead the pack. Granite handles heat and weather but needs annual sealing. Poured concrete allows custom shapes and embedded features like drain grooves: it requires sealing every 1-2 years. Porcelain tile is affordable and durable but grout lines are a weak point, use epoxy grout and seal it.
Avoid marble (stains easily), wood (even treated lumber warps), and standard laminate (delaminates in moisture).
Cabinetry: Stainless steel is the gold standard, it won’t rust, warp, or rot. Marine-grade polymer cabinets are a close second and cost less. If using wood-look cabinets, verify they’re rated for outdoor use with sealed joinery and waterproof backing.
Cladding: Stone veneer, manufactured or natural, gives a high-end look and holds up indefinitely. Stucco is cheaper and works in dry climates but cracks in freeze-thaw zones. Avoid standard siding, it’s not meant for ground-level moisture exposure.
Fasteners and hardware: Use stainless steel screws, bolts, and hinges. Regular steel rusts within a season. Powder-coated finishes help but aren’t a substitute for stainless in high-moisture areas.
Layout Ideas for Different Backyard Sizes
Small patios (under 200 sq ft): Go with an L-shaped bar tucked into a corner. One leg holds the grill and a small prep area: the other provides the bar overhang with seating for 2-3 stools. Total footprint: roughly 6 feet by 4 feet. Skip the sink unless plumbing is right there, use a beverage tub instead.
Medium yards (200–500 sq ft): A straight bar or small island works here. A 10-foot straight run can fit a grill, side burner, sink, and mini-fridge with bar seating on one side. Island layouts (where guests can sit on two or three sides) need at least 8 feet by 4 feet of clearance plus walkway space, figure 12 feet by 8 feet total when accounting for circulation.
Large properties (500+ sq ft): Go big with a U-shaped or full island setup. These can include multiple grills, a pizza oven, a full-size fridge, and a bar that seats 6-8 people. Total footprint can hit 12 feet by 6 feet or more. At this scale, consider zoning: cooking on one side, bar seating on another, and storage/prep in the middle.
Covered vs. open: A pergola or roof structure extends usability and protects appliances, but it’s not required. If the bar is fully exposed, invest in weatherproof covers for the grill and other equipment during off-season months.
Always leave 36 to 48 inches of clearance around the bar for foot traffic. Tight spaces feel cramped and create bottlenecks during gatherings.
Cost Considerations and Budgeting Tips
Outdoor kitchen bars aren’t cheap, but costs vary wildly based on materials, features, and labor.
DIY budget build (basic structure, minimal appliances): $2,000–$4,000. This includes a CMU or steel frame, concrete countertop, a mid-range built-in grill, and basic seating. Homeowners handle framing, countertop pours, and installation. No plumbing or electrical.
Mid-range setup (includes sink, fridge, upgraded materials): $6,000–$12,000. Add a sink with plumbing, an outdoor-rated fridge, granite or tile countertops, and stone veneer cladding. Budget for a licensed plumber ($500–$1,500 depending on distance from the house) and electrician ($300–$800 for outlets and lighting).
High-end custom build (full island, premium appliances, professional install): $15,000–$30,000+. Think stainless steel cabinets, natural stone counters, built-in pizza oven, kegerator, full lighting, and pergola. At this level, most homeowners hire a contractor or outdoor kitchen specialist.
Cost-saving tips:
- Pour your own concrete countertops instead of buying granite slabs, saves $1,000+
- Use steel studs and stucco instead of stone veneer for cladding
- Buy a quality drop-in grill and build the structure around it rather than a full built-in unit
- Run electric and plumbing yourself if local codes allow (always pull permits)
- Source materials during off-season sales (late fall, early winter)
Don’t skimp on: appliances (cheap grills rust out), weatherproofing (sealants, flashing, proper drainage), and structural support (undersized frames sag under granite counters).
Permits: Many jurisdictions require permits for permanent structures over a certain size, electrical work, and plumbing. Expect $100–$500 in permit fees. Skipping permits can cause issues during home sales or insurance claims.
An outdoor kitchen bar is an investment. Done right, it adds functionality and resale value. Done cheaply, it becomes a maintenance headache.