An outdoor modular kitchen turns a backyard patio into a fully functional cooking station, no more running inside for spatulas or hauling trays of burgers across the lawn. Unlike built-in masonry installations, modular units arrive in prefabricated sections that fit together like puzzle pieces, making installation faster and often more budget-friendly. Homeowners gain flexibility in layout and materials while avoiding weeks of construction dust. Whether someone’s planning weekend cookouts or year-round alfresco dining, understanding the components, costs, and durability factors helps them build a setup that handles real-world use without turning into a money pit.
Table of Contents
ToggleKey Takeaways
- An outdoor modular kitchen arrives in prefabricated sections that assemble in days, costing 30–40% less than equivalent custom masonry builds while offering faster installation and minimal site disruption.
- Material choice directly impacts durability: stainless steel (316-grade for coastal areas) lasts 20+ years, while marine-grade polymer and powder-coated aluminum offer lighter, lower-maintenance alternatives for different climates.
- Modular outdoor kitchen layouts range from L-shaped islands for corner patios to U-shaped setups for serious chefs, with costs scaling from basic $2,000–$4,000 builds to high-end $15,000+ installations with gas and electrical hookups.
- Regular maintenance—weekly salt rinsing for coastal locations, annual sealing for concrete counters, and seasonal plumbing checks—extends the life of a modular kitchen to 15–20 years and prevents costly repairs.
- Budget-conscious homeowners can phase construction over multiple seasons, starting with basic cabinets and a grill, then adding sinks and refrigeration modules as needed to spread costs and align with entertaining habits.
What Is an Outdoor Modular Kitchen?
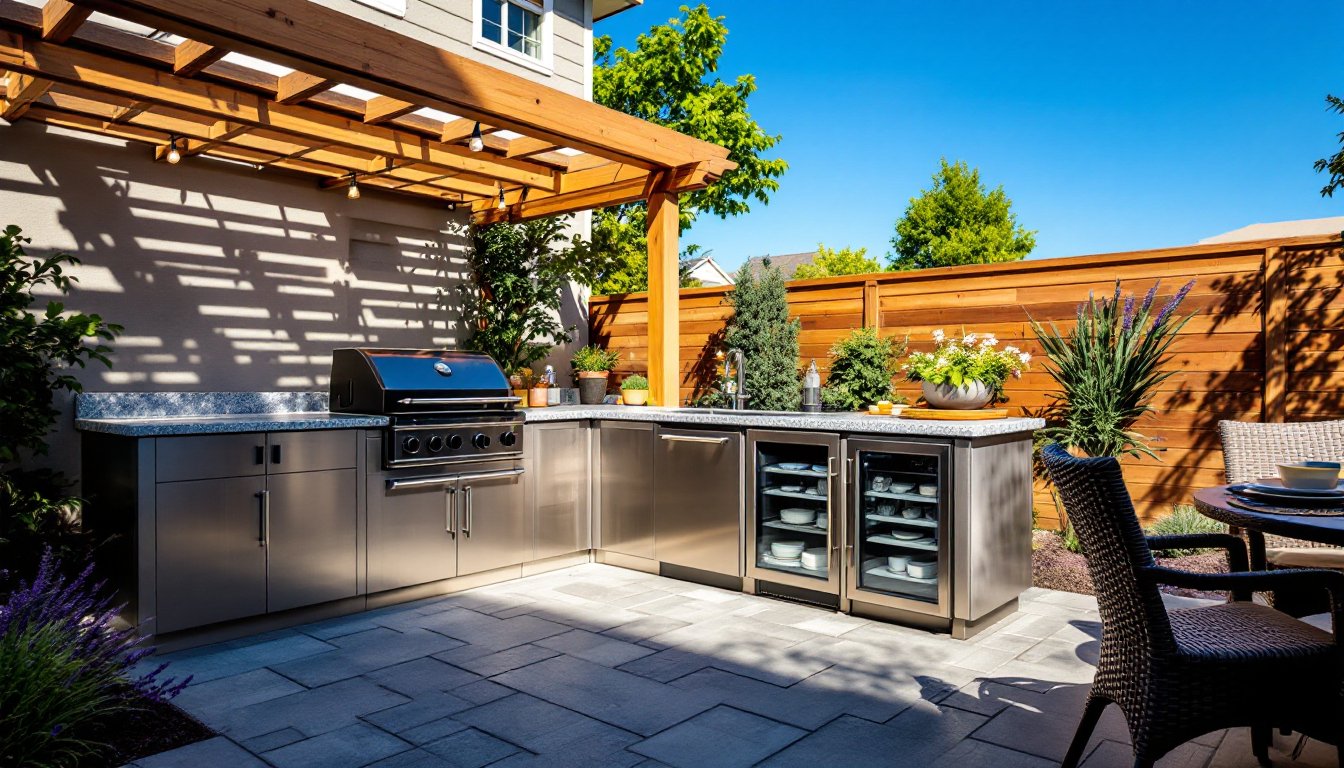
An outdoor modular kitchen consists of pre-engineered cabinet units, countertops, and appliance housings designed for exterior installation. Unlike custom-built outdoor kitchens that require masonry work and on-site fabrication, modular systems ship in standardized sections, typically 24-inch, 30-inch, or 36-inch widths, that connect via brackets or interlocking frames.
Most modular setups include base cabinets rated for UV exposure and moisture, countertop sections (often 36 inches deep to accommodate grills and prep space), and optional overhead storage or pergola mounts. The modular approach allows homeowners to start with a basic grill station and expand later by adding a sink module, refrigerator cabinet, or pizza oven island without tearing out existing work.
These systems differ from standalone carts or mobile islands. Modular units anchor to concrete pads or composite decking and integrate utilities, gas lines, electrical outlets, and plumbing, behind finished panels. Depending on the jurisdiction, installing gas or electrical connections may require permits and inspection by a licensed tradesperson, so homeowners should check local codes before breaking ground.
Benefits of Installing an Outdoor Modular Kitchen
Modular outdoor kitchens offer practical advantages over both portable gear and permanent masonry builds:
- Faster installation: Pre-built modules drop into place in days instead of weeks. A crew can set a three-module island (grill, sink, storage) on a prepared pad in a single afternoon.
- Scalability: Homeowners add or rearrange sections as budgets and needs evolve. Starting with a grill cabinet and adding a beverage fridge two seasons later costs less upfront than funding a complete build.
- Cost efficiency: Factory fabrication reduces labor hours and material waste. Modular units often run 30–40% less than equivalent custom stonework, though high-end stainless models can rival masonry prices.
- Lower site disruption: No concrete mixing, rebar cutting, or tile saws screaming for days. The prep work, usually a level gravel base or reinforced deck, creates minimal mess.
- Portability: If someone moves or redesigns the patio, most modular systems disassemble and relocate. This flexibility appeals to homeowners who aren’t ready to commit to a permanent structure.
For families who entertain frequently or grill year-round in temperate climates, the convenience of having prep sinks, refrigeration, and storage steps from the dining table changes how they use outdoor space. It’s less about Instagram-worthy aesthetics and more about not dripping marinade through the house.
Essential Components and Design Options
Choosing the Right Materials for Durability
Outdoor modules face rain, UV rays, temperature swings, and insects, so material choice directly impacts longevity:
- Stainless steel (304 or 316 grade): Industry standard for coastal or humid climates. 316-grade resists salt corrosion better than 304, critical within five miles of an ocean. Expect 20+ years with minimal rust if welds and fasteners match the cabinet grade.
- Marine-grade polymer: High-density polyethylene (HDPE) cabinets won’t rot, rust, or fade. They’re lighter than steel, simplifying deck installations where load limits matter. Polymer handles freeze-thaw cycles without cracking, a plus in northern climates.
- Powder-coated aluminum: Mid-range option offering corrosion resistance at lower cost than stainless. Quality powder coating withstands UV, but scratches expose bare metal, touch-up paint becomes part of maintenance.
- Exterior-grade wood (teak, cedar): Adds warmth but requires annual sealing. Even treated wood weathers gray and splits without upkeep. Best used for decorative panels rather than structural cabinets.
Countertop choices include granite tile (durable but grout lines trap grease), poured concrete (customizable, needs sealing every 1–2 years), and porcelain slab (stain-proof, pricey). Avoid laminate, it delaminates under moisture and heat.
Popular Layout Configurations for Outdoor Spaces
Layout depends on available square footage and how the kitchen integrates with dining and traffic flow:
L-shaped islands fit corner patios, placing the grill on one leg and sink/prep on the other. This configuration creates a natural serving barrier between cooking and seating zones. Requires roughly 8 × 10 feet of hardscape.
Straight runs (galley style) work along fence lines or under covered porches. They maximize counter space in narrow areas, think 12 feet long by 3 feet deep, but the cook’s back faces guests.
U-shaped setups enclose the cook on three sides, ideal for serious outdoor chefs who want everything within arm’s reach. They demand 10 × 12 feet minimum and work best on open patios where foot traffic doesn’t bottleneck.
Standalone islands (4 × 6 feet typical) suit smaller decks. These include a grill and minimal prep space, relying on indoor kitchens for sinks and storage.
Regardless of layout, keep 42–48 inches of clearance behind the cook for safe movement. If the grill sits near a property line, check setback requirements, many municipalities require 10 feet from structures for open-flame appliances.
Cost Considerations and Budgeting Tips
Outdoor modular kitchen costs vary widely based on materials, size, and utility hookups:
Basic setups (polymer cabinets, tile counters, no plumbing) start around $2,000–$4,000 for a three-module island with a grill cutout. These kits assume DIY assembly on an existing concrete pad.
Mid-range builds ($6,000–$12,000) include stainless steel cabinets, granite counters, a drop-in grill (not included in module price), and a sink with cold-water plumbing. Factor in $800–$1,500 for a licensed plumber to run supply lines and drainage if the site lacks utilities.
High-end installations ($15,000–$30,000+) feature 316-grade stainless, porcelain counters, built-in grills, refrigeration, and natural gas hookups. Electrical work for outlets and task lighting adds $500–$1,200, depending on distance from the breaker panel.
Often-overlooked costs:
- Site prep: Pouring a 4-inch reinforced concrete slab runs $6–$10 per square foot. Gravel and paver bases cost less but may shift over time.
- Permits: Gas line and electrical permits typically cost $50–$200 each. Skipping permits risks fines and complicates insurance claims if something goes wrong.
- Delivery and assembly: Modular units ship on pallets. If the supplier doesn’t include setup, hiring a handyman for a half-day costs $300–$600.
To stretch budgets, homeowners can phase construction, install cabinets and counters first, add the grill and sink the following season. Buying floor models or last-year inventory from outdoor kitchen dealers sometimes yields 20–30% discounts. Avoid ultra-cheap imports with thin-gauge steel: they dent easily and rust within two seasons.
Maintenance and Care for Long-Lasting Performance
Outdoor modular kitchens need regular attention to avoid corrosion, pest intrusion, and component failure:
Stainless steel surfaces: Wipe down after each use with a microfiber cloth and mild detergent. Once a month, apply stainless steel polish to remove water spots and fingerprints. Coastal owners should rinse cabinets with fresh water weekly to wash off salt spray. Check welds and seams annually for rust bloom, catch it early with a wire brush and touch-up paint.
Polymer cabinets: Hose off debris and scrub with dish soap. Polymer doesn’t corrode, but dirt buildup attracts insects. Inspect door hinges and drawer slides for sand or grit that causes binding.
Countertops: Seal granite and concrete yearly using a penetrating sealer (follow manufacturer’s dry time). Porcelain needs only soap and water. Avoid abrasive cleaners on any surface, they dull the finish and create scratches where bacteria hide.
Plumbing and gas lines: Before winter in freezing climates, drain all water lines and blow them out with compressed air to prevent burst pipes. Disconnect propane tanks or shut off natural gas valves during off-season. Each spring, check gas fittings with soapy water for leaks (bubbles indicate escaping gas, call a pro if detected).
Appliances: Clean grill grates and burner tubes per the manufacturer’s schedule. Grease fires start in neglected fireboxes. Cover the entire kitchen with waterproof, UV-resistant covers when not in use, especially during storms. Covers reduce UV damage and keep rodents from nesting in cabinets.
Pest control: Seal gaps around utility penetrations with stainless steel wool and exterior-grade caulk, mice chew through foam. Store trash in sealed bins away from the kitchen to avoid attracting raccoons or insects.
Homeowners in snowy regions should shovel around modules to prevent meltwater pooling against cabinet bases. Those in high-humidity areas benefit from adding ventilation louvers to cabinet backs, reducing mildew inside enclosed spaces.
With consistent upkeep, a quality modular outdoor kitchen delivers 15–20 years of service, long enough to host countless backyard meals and justify the investment. Neglect the basics, though, and even premium materials deteriorate within a decade.