Building an outdoor kitchen extends living space beyond four walls and turns routine grilling into genuine entertaining. What starts as a simple patio grill often evolves into a fully outfitted cooking zone complete with counters, storage, and running water. Whether someone’s planning a built-in island with a pizza oven or a modest prep station beside the deck, the right approach balances ambition with budget, climate realities, and actual cooking habits. An outdoor kitchen isn’t just about stainless steel and stone, it’s about creating a functional workspace that survives weather, hosts weekend barbecues, and actually gets used more than twice a summer.
Table of Contents
ToggleKey Takeaways
- An outdoor kitchen can increase home resale value by 5–10% while keeping cooking heat and mess outside during warm months.
- Building an outdoor kitchen requires essential components including a quality grill, counter space (at least 24 inches on each side), storage using marine-grade materials, and a sink with proper water lines installed below frost line.
- Outdoor kitchen costs range from $3,000 for a basic DIY project to $50,000+, with most mid-range builds landing between $8,000–$20,000 depending on appliances and finishes.
- Use weather-resistant materials like granite, porcelain tile, or sealed concrete for countertops, and 304+ stainless steel or galvanized fasteners to prevent corrosion and rust.
- Plan your outdoor kitchen layout using the work triangle principle (keeping grill, sink, and refrigeration within 15–20 feet), maintain 48 inches of clearance behind the cook, and pull necessary permits for gas, electrical, and structural work.
- Choose durable framing options like pressure-treated lumber, galvanized steel, or concrete block, and install a waterproof membrane behind all exterior cladding to protect against UV, rain, and freeze-thaw cycles.
Why Invest in an Outdoor Kitchen?
An outdoor kitchen delivers measurable returns beyond Instagram appeal. It keeps cooking heat, smoke, and mess outside during warm months, reducing indoor AC costs and kitchen wear. Homes with quality outdoor kitchens often see 5–10% increases in resale value, particularly in markets where year-round outdoor living is feasible.
From a practical standpoint, outdoor kitchens centralize entertaining. Hosts stay engaged with guests instead of shuttling between the grill and the indoor fridge. Setup also encourages actual cooking, not just burgers, but full meals using multiple heat zones, side burners, and prep surfaces.
The investment makes sense for households that grill regularly (twice a month or more), entertain outdoors, or live in temperate climates where outdoor cooking extends beyond summer. In northern regions with short seasons, a simpler setup often suffices. Anyone in a community with an HOA should verify design restrictions and setback requirements before breaking ground.
Essential Components Every Outdoor Kitchen Needs
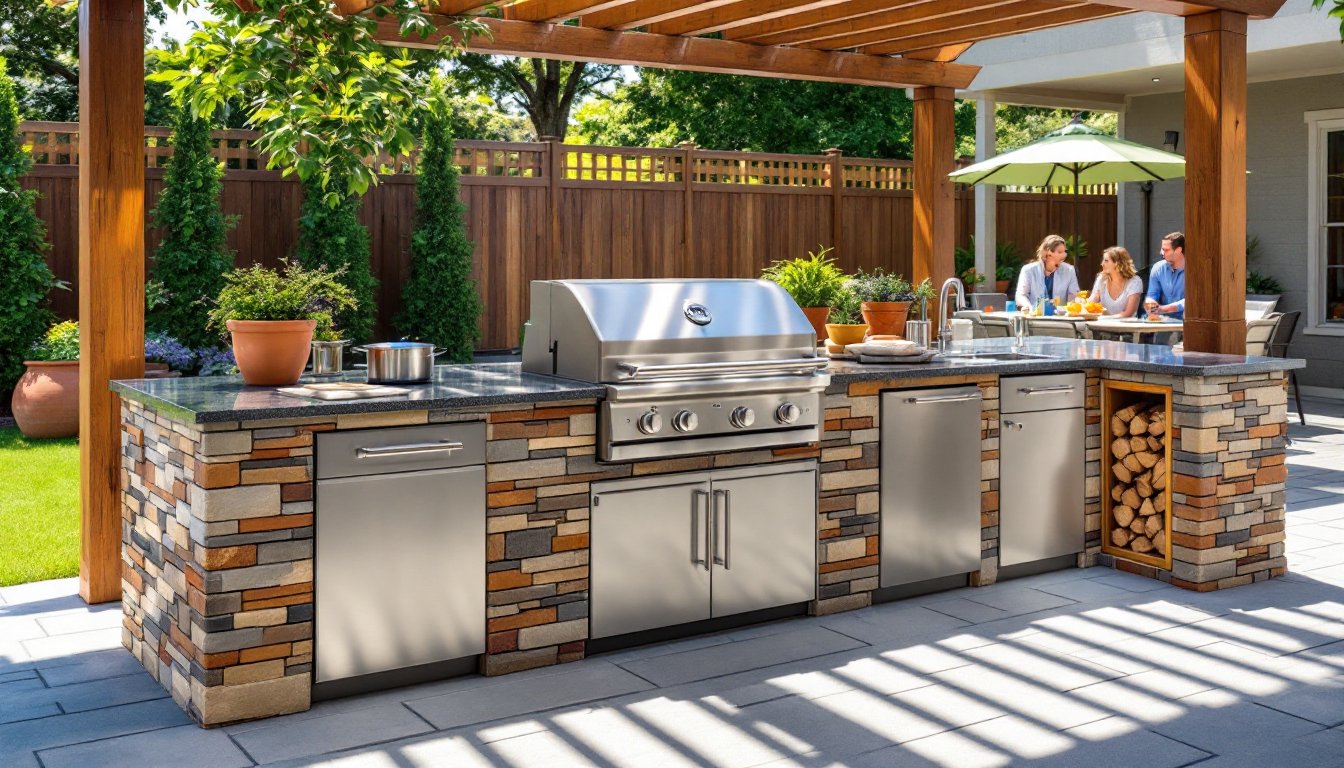
Cooking Appliances and Grilling Stations
The grill anchors most outdoor kitchens. Built-in gas grills (typically 36–42 inches wide) offer convenience and consistent heat control, while charcoal or wood-fired options deliver flavor purists prefer. Serious cooks add a side burner for sauces or boiling corn, plus a pizza oven (wood or gas) for high-heat baking.
Infrared burners provide intense searing temps (up to 1,500°F), ideal for steaks. Rotisserie kits handle whole chickens and roasts. For flexibility, some builders incorporate a griddle top for breakfast or stir-fries. All gas lines must meet local codes, typically black iron pipe or CSST (corrugated stainless steel tubing) installed by a licensed plumber or gas fitter. Most jurisdictions require permits for permanent gas connections.
Safety note: Ensure adequate ventilation around enclosed grills. Carbon monoxide buildup is a real risk in covered or partially enclosed spaces. Never install a grill under a low roof overhang without proper clearance (check manufacturer specs, usually 3 feet minimum).
Storage and Counter Space Solutions
Counter space matters more than most DIYers anticipate. Plan for at least 24 inches of landing area on each side of the grill for platters, tools, and prep work. Concrete countertops, tile, and granite all work: poured-in-place concrete offers customization but requires forming and finishing skills. Granite or porcelain tile provides a simpler install for experienced tile setters.
Cabinets and drawers should use marine-grade stainless steel (304 or 316 grade) or polymer materials designed for exterior exposure. Standard indoor cabinetry warps and delaminates outdoors. Include enclosed storage for propane tanks, utensils, and trash, open shelving collects debris and invites pests.
A small sink (15–18 inches) with a cold water line simplifies cleanup. Running PEX or copper supply lines underground requires trenching below frost line depth (varies by region, 36 inches in many northern zones, 12–18 inches in the South). Install a shutoff valve indoors to winterize the system. Drainage can tie into existing yard drains or a dry well, depending on local codes. Check with the building department before connecting to municipal sewer lines.
Design Styles and Layout Options for Outdoor Kitchens
Outdoor kitchens generally follow three layouts: L-shaped, U-shaped, or straight galley. L-shaped designs fit corner patios and provide distinct zones for cooking and serving. U-shaped layouts (or islands) create a social hub where the cook faces guests. Straight galley setups work for narrow spaces or against a house wall.
Measure the work triangle, the distance between grill, sink, and refrigeration. Keeping this zone compact (15–20 feet total) reduces steps and increases efficiency. Leave at least 48 inches of clearance behind the cook for traffic flow and safe movement with hot pans.
Style-wise, many outdoor kitchens echo the home’s architecture. Rustic designs use stacked stone veneers, rough-sawn timber accents, and hammered copper sinks. Modern builds favor smooth stucco, horizontal-grain cabinetry, and concrete counters with integral sinks. Mediterranean or Spanish themes incorporate colorful tile, arched openings, and plaster finishes.
Covered structures (pergolas, pavilions, or roof extensions) protect appliances and extend usability. A simple 10×12-foot pergola can be DIY-built for under $1,500 in materials, while a full pavilion with electrical and a standing-seam metal roof runs $8,000–$15,000 installed. Verify local zoning, many areas classify covered outdoor kitchens as accessory structures subject to setback rules and square-footage limits.
Materials and Durability: Choosing What Lasts
Outdoor kitchens face UV, rain, freeze-thaw cycles, and temperature swings. Material selection determines whether the setup lasts a decade or needs rebuilding in five years.
Countertops: Granite, porcelain tile, and poured concrete all handle weather. Avoid laminate and butcher block, they fail outdoors. Concrete needs sealing every 1–3 years to resist staining. Granite is low-maintenance but heavy: ensure the base structure can support 18–20 pounds per square foot.
Framing and structure: Use pressure-treated lumber (ground-contact rated for any wood touching soil), galvanized steel studs, or concrete block. Standard framing lumber rots. Steel framing (20-gauge or heavier) resists corrosion if properly coated. Concrete block provides excellent durability and fire resistance, ideal behind grills.
Exterior finishes: Stacked stone veneer, stucco, and cement board siding hold up well. Ensure a waterproof membrane (like peel-and-stick rubberized asphalt or liquid-applied barrier) behind all cladding. Brick veneer and natural stone require flashing and weep holes to drain trapped moisture.
Stainless steel: Look for 304 stainless as a minimum: 316-grade resists salt air better in coastal areas. Magnetic stainless is usually 430-grade, it’s cheaper but corrodes faster.
Hardware and fasteners: Use stainless steel or hot-dipped galvanized screws and bolts. Standard zinc-plated hardware rusts within a season.
Budget Planning and Cost Considerations
Outdoor kitchen costs range from $3,000 for a basic DIY island to $50,000+ for full custom builds with high-end appliances. Realistic mid-range projects land between $8,000–$20,000.
Budget tiers:
- Basic (DIY, $3,000–$7,000): Simple island with a drop-in grill, concrete block base, tile or concrete counter, no plumbing or electrical.
- Mid-range ($8,000–$20,000): Built-in grill, side burner, small fridge, sink with cold water, stainless doors, granite or concrete counter, basic lighting.
- High-end ($20,000–$50,000+): Premium grills (Lynx, Alfresco), pizza oven, full-size fridge, kegerator, hot and cold water, multiple zones, pergola or roof, professional install.
Appliances drive cost. A quality built-in gas grill runs $1,200–$4,000. Outdoor-rated refrigerators start around $800: full-size units cost $2,000–$4,500. A basic outdoor sink and faucet kit runs $150–$400, but plumbing labor adds $500–$1,500 depending on distance from the house.
DIY labor saves significantly. A motivated homeowner with concrete, plumbing, and basic framing skills can tackle most components. Gas line work and electrical (especially if running a new circuit for outlets, lighting, or 240V appliances) should involve licensed trades unless the builder holds relevant permits and knows local code.
Permits: Expect to pull permits for gas, electrical, and possibly structural work. Permit costs vary, typically $100–$500 total, but skipping them risks failed inspections at resale and liability if something goes wrong.
Factor in 10–15% contingency for unforeseen expenses: undersized wire that needs upgrading, rock discovered during trenching, or additional drainage work. Outdoor projects always reveal surprises once digging starts.