Building an outdoor kitchen transforms a basic backyard into a full-service entertaining space. But it’s not just about dropping a grill on a patio slab. A well-built outdoor kitchen requires proper framing, weatherproof materials, utility connections, and a solid foundation. With the right planning and execution, most DIYers with intermediate carpentry and masonry skills can tackle this project over a few weekends. This guide walks through the entire process, from layout and foundation to appliances and finishing touches, so builders can create a durable, functional cooking zone that’ll hold up to weather and heavy use. Permits may be required for electrical, gas, and structural work depending on local codes.
Table of Contents
ToggleKey Takeaways
- Building an outdoor kitchen requires proper framing, weatherproof materials, utility connections, and a concrete foundation—a project most intermediate DIYers can complete over a few weekends.
- Plan your outdoor kitchen layout using a work triangle design with the grill as the focal point, at least 24 inches of countertop on each side, and proper fire safety setbacks of 10 feet from the house.
- Pour a 4-inch reinforced concrete slab foundation that slopes 1/4 inch per foot for drainage and cures for at least 7 days before construction begins.
- Rough in gas, electrical, and plumbing utilities before installing countertops, and hire licensed professionals for gas lines, electrical circuits, and structural work as required by local codes.
- Finish your outdoor kitchen with weather-resistant materials like granite, concrete, or porcelain tile countertops, non-combustible veneer, and annual sealing to protect against UV exposure and moisture.
- Check local building codes early in the planning phase, as many jurisdictions require permits for structures over certain square footages or any work involving gas, electrical, or permanent roofing.
Planning Your Outdoor Kitchen Layout and Design
Start by sketching the layout on graph paper or using a design app. A standard L-shaped or straight-line configuration works best for most yards, keeping the grill, prep area, and storage within a comfortable work triangle.
Consider workflow: place the grill as the focal point, with at least 24 inches of countertop on each side for plating and utensils. Add a sink if running water is feasible, positioned near the prep zone. Storage cabinets or drawers go underneath counters.
Measure the space carefully. A basic outdoor kitchen runs 6 to 10 feet long and 24 to 30 inches deep, though larger setups can extend to island configurations. Account for clearances: keep the grill at least 10 feet from the house or any combustible structure per fire safety standards, and leave 36 to 48 inches of open space in front for safe movement.
Decide on appliances early, built-in grills, side burners, refrigerators, and pizza ovens all dictate framing dimensions. Write down the rough opening sizes from manufacturer specs. Gas and electric appliances will need utility rough-ins planned now, not later.
Check local codes. Many jurisdictions require permits for structures over a certain square footage, and anything involving gas lines, electrical circuits, or permanent roofing will likely need inspection.
Choosing the Right Location and Foundation
Location determines durability and usability. Choose a spot with level ground, good drainage, and proximity to existing utilities. Avoid low-lying areas where water pools. Placing the kitchen near the house shortens utility runs and makes it easier to carry food and supplies, but maintain required setbacks.
The foundation must support the weight of masonry, countertops, and appliances. For most outdoor kitchens, a 4-inch reinforced concrete slab is the standard. Pour it at least 6 inches wider than the finished frame on all sides.
Steps for pouring the slab:
- Excavate the area to 6 to 8 inches deep, depending on your region’s frost line and soil conditions.
- Lay 4 inches of compacted gravel base for drainage.
- Install rebar grid or 6×6 wire mesh for reinforcement.
- Pour and screed the concrete, finishing with a trowel. Slope it slightly (1/4 inch per foot) away from the house for drainage.
- Let it cure for at least 7 days before building on it.
Alternatively, for a smaller setup, some builders use a compacted paver base with interlocking pavers rated for heavy loads. This works for lighter frames but may shift over time. Concrete is more permanent and stable, especially for structures with stone veneer or heavy countertops.
Essential Materials and Tools You’ll Need
Materials:
- 2×4 pressure-treated lumber for framing (or steel studs for non-combustible construction near grills)
- Concrete backer board (1/2-inch HardieBacker or DensShield) for sheathing
- Galvanized or stainless steel screws (exterior-rated)
- Masonry veneer (stacked stone, brick, or stucco) or outdoor-rated siding
- Granite, concrete, or tile countertop material
- Outdoor-rated cabinetry or marine-grade plywood with waterproof finish
- Gas line components: black iron pipe or CSST flexible gas line (installed by licensed professional if required)
- Electrical: GFCI outlets, weatherproof boxes, and 20-amp circuit wiring
- Plumbing: PEX or copper supply lines, shutoff valves
Tools:
- Circular saw or miter saw
- Drill/driver with bits
- Level (4-foot and torpedo)
- Tape measure
- Masonry trowel and mixing tools (if applying stone or stucco)
- Tile saw (if cutting stone or tile countertops)
- Adjustable wrench and pipe wrenches (for gas/water connections)
- Safety gear: safety glasses, work gloves, dust mask, ear protection
For masonry work, rent a mixer if working with more than a few bags of mortar. A wet tile saw is essential for cutting stone or porcelain tile cleanly.
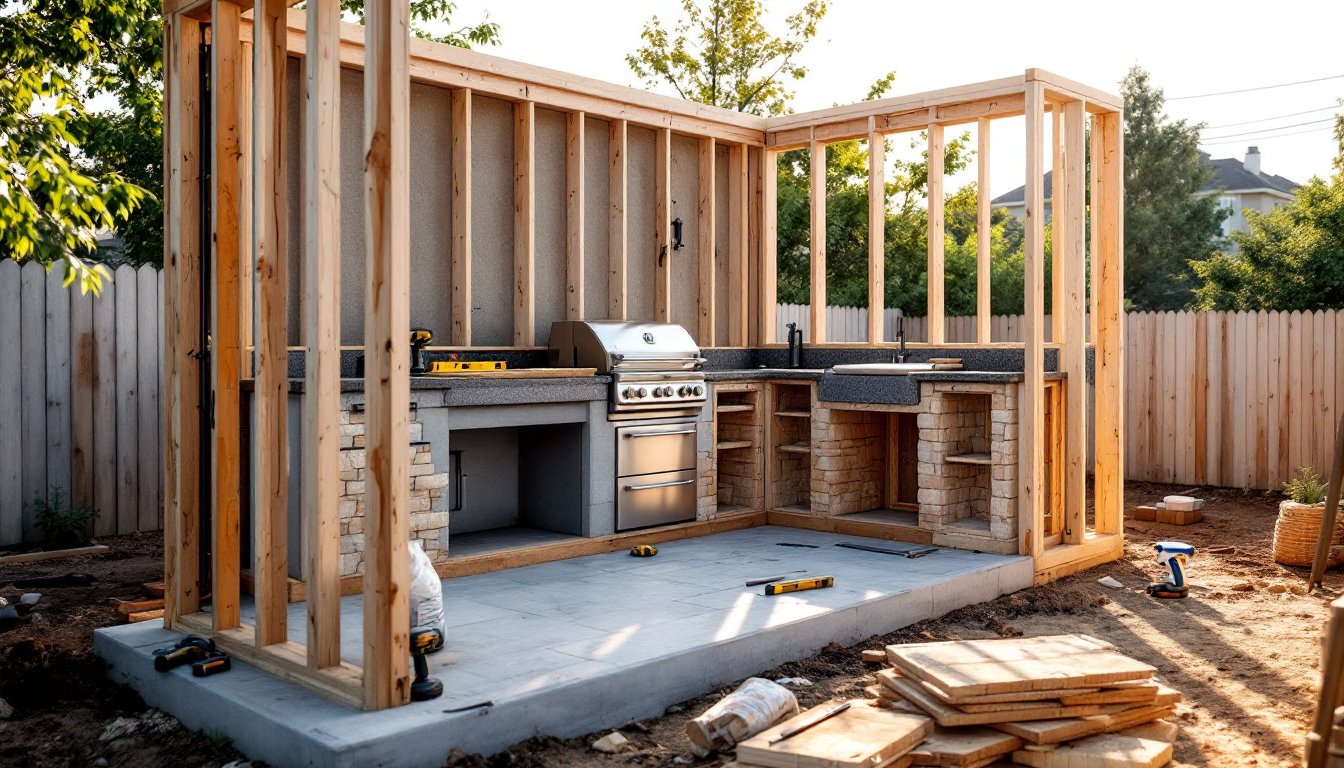
Building the Kitchen Frame and Structure
Frame the outdoor kitchen like an interior wall, but using materials rated for exterior exposure. If building near an open flame, some codes require metal studs or non-combustible framing within a certain distance of the grill, check local fire codes.
Steps to build the frame:
- Mark the layout on the slab with chalk lines, following your design dimensions.
- Cut pressure-treated 2x4s for the bottom plate. Fasten to the concrete slab using Tapcon screws or concrete anchors every 16 inches.
- Cut vertical studs to height (typically 34 to 36 inches for standard counter height). Space studs 16 inches on center for strength, and closer (12 inches) around appliance openings.
- Add a top plate, fastening studs with 3-inch exterior screws.
- Frame openings for the grill, side burners, doors, and drawers according to appliance rough opening specs. Use double studs on each side of openings and a header across the top.
- Sheathe the frame with 1/2-inch cement backer board, attaching with galvanized screws every 8 inches. This provides a waterproof, non-combustible base for masonry or tile veneer.
If adding a roof or pergola, now’s the time to install vertical posts and beams. Anchor posts to the slab with galvanized post bases and through-bolts. Roof structures may require engineered plans and permits depending on size and wind/snow loads in your region.
Installing Countertops, Appliances, and Utilities
Utilities first. Before setting countertops, rough in gas, electric, and water lines. This work often requires licensed contractors:
- Gas lines: Run black iron pipe or CSST from the meter to the grill location. Include a shutoff valve within 6 feet of each appliance. Pressure-test all connections and have them inspected.
- Electrical: Install a dedicated 20-amp GFCI circuit for outlets and appliance connections. Use weatherproof outlet covers rated for wet locations. Bury underground conduit at the depth required by the NEC (typically 18 inches for PVC conduit).
- Plumbing: Run PEX or copper supply lines to the sink location. Install shutoff valves and a drain line that slopes toward a French drain, drywell, or existing yard drainage.
Countertops: Outdoor counters must handle UV, moisture, and temperature swings. Popular choices include:
- Granite or quartz slabs (seal annually)
- Poured or precast concrete countertops (durable, customizable)
- Porcelain tile over cement board (budget-friendly, requires grout maintenance)
Rest the countertop on the framed structure. Secure with construction adhesive and screws driven up through the top plate into the underside (avoid exposed fasteners on the surface).
Install appliances by dropping them into framed openings. Built-in grills typically rest on the countertop with a trim kit covering the edges. Secure with brackets per manufacturer instructions. Connect gas and electric per code.
Add outdoor-rated cabinet doors and drawer fronts. Marine-grade polymer or stainless steel holds up better than wood.
Adding Finishing Touches and Weather Protection
Apply the exterior finish to complete the look. Options include:
- Stacked stone or brick veneer: Apply with mortar over the cement backer board. Start at the bottom and work up, using spacers for consistent joints. Seal with a breathable masonry sealer.
- Stucco: Apply a scratch coat, brown coat, and finish coat. This requires some skill, consider hiring a plasterer if unfamiliar with the process.
- Outdoor siding or panels: Fiber cement or PVC trim boards offer a clean, modern look and install quickly.
Seal all countertop surfaces. Granite and concrete need a food-safe penetrating sealer reapplied annually. Grout lines in tile should be sealed to prevent staining and moisture infiltration.
Add a backsplash behind the grill if it’s near a wall, use non-combustible tile or stone. Install hood ventilation if the kitchen is under a roof or pergola: this exhausts smoke and grease safely.
Consider lighting: low-voltage LED strips under cabinets, task lights over the grill, and ambient string lights or sconces create usability after dark. All fixtures must be wet-location rated.
Finally, apply weatherproofing to joints and seams. Use exterior-grade silicone caulk around countertop edges, appliance openings, and anywhere water might seep in. Inspect and reapply caulk annually as part of routine maintenance.
Conclusion
Building an outdoor kitchen is a manageable project for DIYers comfortable with framing, masonry, and basic utility work. Start with a solid foundation and realistic layout, frame carefully to accommodate appliances, and don’t cut corners on weatherproofing or code compliance. The result is a durable, functional outdoor cooking space that expands usable square footage and adds value to the property. Take it one phase at a time, and don’t hesitate to bring in licensed help for gas, electrical, or structural work when local codes require it.